Macedonia book cover

It’s recipe tasting time again so check out this great recipe for Macedonian baked beans or Tavche Gravche.

We wanted to give you a chance to try out a dish from our up and coming title Macedonia – The Cookbook: Recipes & Stories From The Balkans by Katerina Nitsou. With many of us still not knowing if we can travel to other countries this summer for holidays, and others already decided that something closer to home is more likely to be the best option, then at least we can travel still in our kitchens and through our cooking. Food has long been a way to experience other places and cultures. 

Macedonian village in the mountains

Katerina’s recipes and stories aim to take you into the heart of Macedonian cuisine and give you an appreciation of the food of this fascinating and diverse country that fuses influences from the Mediterranean, the Middle East and Eastern Europe. And where better to start than with this very traditional Macedonian take on ‘baked beans’ – Tavche Gravche.

We hope you enjoy cooking it and eating it as much as we have here at KP HQ.

A pan of Macedonian Baked Beans or Tavche Gravche

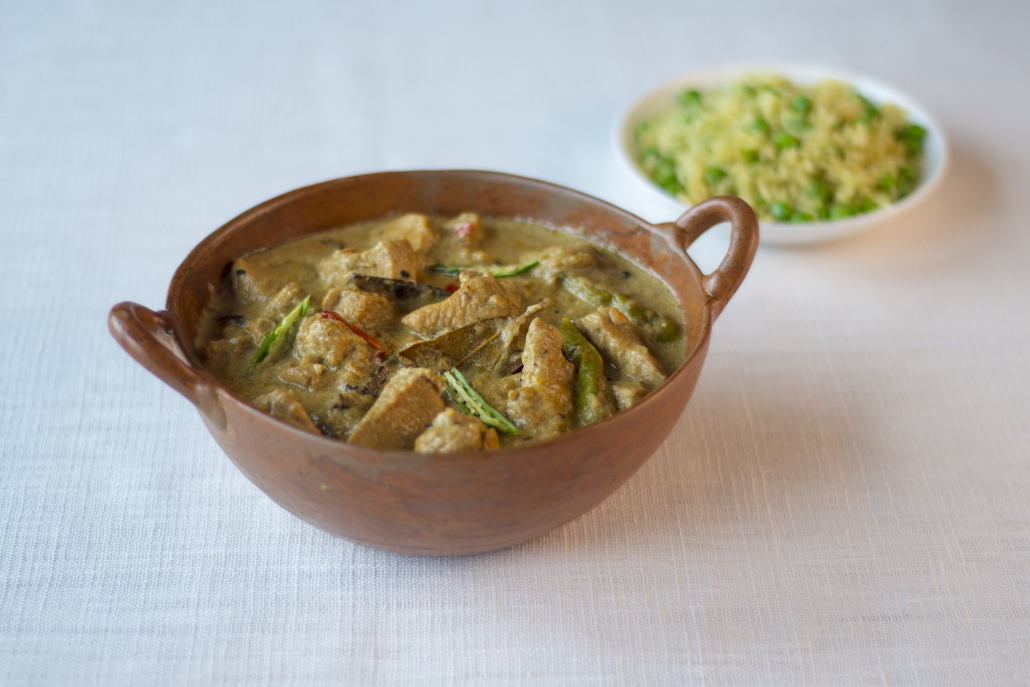
Tavche Gravche (Macedonian Baked Beans)

This is Macedonia’s national dish, appearing on the table for weekday meals and celebrations alike. It is almost always served on Christmas Eve and for weddings and funerals. A simple dish of stewed beans and red peppers, it goes well with numerous meat, poultry and fish dishes but is just as good on its own with crusty bread. It is not fancy or extravagant, but captures the true essence of traditional Macedonian cuisine.

Serves 4 to 6
  • 370g dried cannellini beans, soaked for at least 6 hours in plenty of water
  • 15g unsalted butter
  • 1 medium onion, diced
  • 1 red pepper, diced
  • 1 teaspoon paprika
  • 2 tablespoons plain flour
  • 1 litre boiling water
  • 1 tablespoon sea salt
  • 2 teaspoons chopped fresh mint
  • 2 teaspoons chopped fresh parsley

Drain and rinse the beans and place them in a medium stockpot with 2 litres of fresh water. Bring to a boil over high heat. Reduce the heat to medium and simmer, uncovered, for 30 minutes until tender. Drain and set aside.

Preheat the oven to 190C. In a Dutch oven, melt the butter over medium heat. Add the onion, red pepper and paprika. Sauté until the vegetables are tender, 3 to 4 minutes. Sprinkle in the flour and stir to coat the vegetables. Sauté for an additional 2 minutes. Pour in the boiling water, salt and beans. Gently stir and bring to a simmer. Cover with a lid or foil and braise in the oven for an hour.

Sprinkle with mint and parsley and bake, uncovered, for another 30 minutes. Serve hot or at room temperature.

Pre-order Macedonia – The Cookbook by Katerina Nitsou

Dreaming of an alternative festive feast?
Dreaming of Alternative Festive Feasts? Illustration by Kaylene Alder
Dreaming of a tropical Christmas? We may have the answer… illustration by Kaylene Alder

Our KP gift to you this Christmas is a couple of ideas for Alternative Festive Feasts. Many of us will soon be sitting around a dinner table sharing a festive meal together, so we thought we’d end the year by offering you some recipes to give your dinner a twist. First up:

Roast Pork By Fish, Wings & Tings (as featured in Recipes from Brixton Village by Miss South)

How about this year we cook Trinidadian Roast Pork instead to spice things up a wee bit? For those who can’t bear the sight of turkey and don’t give a damn about goose, here is a more tropical take on the festive main dish.Very simple but packed with flavour! Light up Xmas Day, Boxing Day or whenever you wish with a heavy dose of hot sauce. In this glorious dish pork belly is marinated in a powerful blend of ginger, garlic, thyme, scotch bonnet, dark rum and other lovely stuff. It’s 100% guaranteed to transform your festivities for sure. Just serve up with rum punch and dancing!

Ingredients
  • 1kg fresh boneless pork belly, skin left on and scored
  • 8cm piece of ginger
  • 25 cloves of garlic, peeled and grated
  • 1 tablespoon fresh thyme leaves
  • 2 scotch bonnet peppers, finely chopped
  • 375ml dark rum
  • 10-15 dashes Angostura bitters
  • 2 tablespoons annatto oil
  • sea salt and freshly ground black pepper

Ask your butcher to score the skin on the pork or use a super sharp knife to do this yourself. Place the pork in a dish and season well with salt and pepper.

Finely grate the ginger and then squeeze the pulp over a small bowl to extract the juice. Discard the pulp. Add all the remaining ingredients to the ginger juice and mix, then pour the marinade over the meat. Massage it into the pork (it’s best to wear gloves for this if you’re sensitive to chilli) and leave it to marinate overnight in the fridge.

Preheat the oven to 250C and take the pork out of the fridge to come up to room temperature. Line a roasting tin with foil and place the pork in it, scraping off any excess marinade.

Roast the pork for an hour, then remove from the oven and allow to cool. Cut the pork into cubes and serve with hot pepper sauce on the side. The skin will be crisp and the meat very tender.

Buy Recipes from Brixton Village by Miss South here

And for those diners who are tired of meat, could we suggest:

Aubergine Parmigiana from The Parlour Cafe Cookbook

Alternative festive feasts are also for veggies! Layers of piping-hot aubergine, tomato, mozzarella and basil will make for a golden and bubbling treat. Serve it all up in one dish and save on washing up time allowing you to focus on more important things like vino and zoom calls with friends.

Ingredients
  • 4 large aubergines
  • 100ml olive oil
  • 20 vine tomatoes
  • 2 teaspoons icing sugar
  • 375g mozzarella
  • 30g basil leaves, stalks removed
  • 70g Parmesan
  • 500ml homemade tomato sauce
  • salt and freshly ground black pepper

Preheat the oven to 220C.

Heat a couple of large baking trays in the oven. Cut the aubergines into 2cm slices widthways. toss the slices in 5 tablespoons of the olive oil until they are all glistening. Season with salt and freshly ground black pepper and space them out on the hot oven trays, making sure they have enough room. Put them in the oven and bake until browned (20 minutes should do it).

Cut the tomatoes in half and scoop out the seeds with a teaspoon. Toss them in the remaining olive oil, season and put onto hot oven trays, then douse in sieved icing sugar for the sweet sensation and bake for 20 minutes.

Reduce the oven to 180C.

Cut the mozzarella into thinnish slices. Spread some of the tomato sauce over the base of a large, deep oven-proof dish 9at home I use an oval one about 30 x 20cm and 6cm deep).

Once the aubergines and tomatoes are out of the oven and have cooled, start building your parmiagana. Start with a layer of aubergine, then tomato, then mozzarella and basil and repeat, finishing with a layer of mozzarella.

Now place some more dollops of tomato sauce loosely over the top and sprinkle generously with shavings of Parmesan. Bake for 30 to 40 minutest until golden and bubbling.

Buy The Parlour Cafe Cookbook by Gillian Veal here

spiced mulled wine from the Mountain Cafe Cookbook

Mountain Cafe Mulled Wine – it could be time to add extra brandy?

Let’s face it, many of us will be gathering in whatever groups we are allowed to around fire pits and beneath makeshift gazebos this festive season. So we thought it would be a good time to share our favourite festive tipple with you all.

Recipe from The Mountain Cafe Cookbook by Kirsten Gilmour

Every winter I love to look out of the kitchen around 4pm to see the cafe full of skiers, walkers, climbers and winter adventurers, sipping our hot drink specials and devouring cakes after an epic day in the Cairngorms.

Mountain Cafe Mulled Wine Ingredients
  • 750ml red wine (not super expensive, just a decent drop)
  • 100ml orange juice
  • 100ml diluting Ribena
  • 70ml brandy
  • 100g vanilla sugar
  • 2 whole cloves
  • 2 star anise
  • 1 cinnamon stick
  • 2 cardamom pods
How to Make Your Mulled Wine

Place everything in a heavy-bottomed pan and bring to the boil for 10 to 15 minutes. Reduce to a simmer for 30 minutes to an hour. Taste and add extra brandy, sugar or orange juice as you like.

That’s it!

Buy The Mountain Cafe Cookbook here – you’ll not regret it.

flavoured butters wrapped in clingfilm ready for the fridge
Flavoured butters wrapped in clingfilm ready for use

From The Seafood Shack – Food & Tales from Ullapool

by Kirsty Scobie & Fenella Renwick

Flavoured butters are really quick and easy and are something Kirsty & Fenella use all the time to boost flavour and jazz up their seafood. In the Shack they use them instead of plain butter in most of their dishes. And they’re not just good for fish dishes – put a slice on a steak after cooking, stick some in your baked potatoes, stir into pasta. Whatever you’re cooking, these little flavour bombs will take it to a different level of tastiness. You can store them in the fridge for weeks or pop them in the freezer to take out when needed. Some of the flavours Kirsty & Fenella make at the shack include Chilli, Paprika and Lime; Mixed Herb; Lemon, Caper and Dill; Pesto and Saffron and Sweet Shallot but here’s the recipe for one of our favourites, Roast Garlic and Chive.

Roast Garlic & Chive Butter

  • 1 whole garlic bulb
  • 250g salted butter, softened
  • small handful of chives, chopped
To make your butter

First roast the garlic.

Preheat the oven to 120°C. Slice the bottom off the garlic bulb so the ends of the cloves are exposed. Now get a sheet of tin foil, scrunch it into a small bowl, and put in your olive oil and a good amount of salt and pepper. Put your garlic bulb on top of the oil, cut side down. Wrap your tin foil over the top of the bulb to seal in a parcel and cook in the oven for around 45 minutes to an hour.

Check if the garlic’s ready by removing from the oven and giving it a wee squeeze – it should be super soft. If it’s not, put it back in the oven for another ten minutes or so and cook until soft but make sure you don’t burn it. Remove the garlic from the tin foil parcel. Once it’s cool enough to touch, flake off any loose peel and squeeze the soft garlic cloves out of the skin. They should slide out easily.

Place the roasted garlic flesh in a bowl with the softened butter and the chives and mix with a wooden spoon. We always season our butters with just a little amount of salt and some fresh black cracked pepper.

To roll your butter

Get some clingfilm and cut it about the size of an A3 sheet of paper. Lie this out flat on your worktop and spoon the butter mixture across the middle in a horizontal line, leaving about
a hand space on either side. Now hold the corners of the clingfilm closest to you and fold over the butter. Run your hands along the butter to the edges to smooth out and remove any air holes. Twist the clingfilm at either end and gently roll your butter to form a good cylinder shape. Perfect for storing in the fridge and freezer! Now why not try some more flavoured butters with your own favourite seasonings?

Buy The Seafood Shack – Food & Tales from Ullapool here

Soup is simple!
Soup is simple!

‘Soup is simple!’ says Fraser Reid. Well, he would know – he is the author behind one of our favourite and perenially popular titles, Seasonal Soups. Fraser runs Fraser’s Fruit & Veg in Dundee which focuses on supplying the most local produce that he can source. The aim, he says, is ‘to get produce harvested that morning and onto the shelves within the next couple of hours’ from local farms, allotments and even local gardens.

Here is Fraser’s vegan-friendly recipe for Butternut Squash, Coconut and Apple Soup which makes very tasty use of some autumnal staples.

Butternut Squash, Coconut & Apple Soup

The apple in this soup acts as a sweetener and can easily be replaced by using a pear, peach or apricot (depending on the time of year).

Ingredients

  • 1 tbsp olive oil or butter
  • 1 onion, peeled and roughly chopped
  • 1 carrot, peeled and roughly chopped
  • 1 teaspoon garam masala
  • 1 butternut squash, peeled, deseeded and diced
  • 1 apple, peeled, cored and roughly chopped
  • 2 stock cubes
  • 1.5 tbsp creamed coconut
  • salt and freshly ground pepper to taste

Method

Heat a pot on a medium-low heat and add the oil or butter. Fry the onion, carrot and garam masala for 5-10 minutes.

Add the squash and apple and continue to cook for 5 minutes.

Pour in 1.2 litres of boiling water and add the stock cubes and the creamed coconut, stirring to make sure it dissolves. Bring to the boil, then turn down the heat and simmer for 20 minutes.

Blend the soup until smooth, then season to taste.

Serves 4

Buy Seasonal Soups here

Twisting the legs off a cooked crab

Do not be afraid of crabs! Once you have mastered the art of how to dissect a crab, then a world of amazing recipes from crab bisque to hot dressed crab to creamy crab linguine and beyond opens right up for you. So no need to worry if you can’t tell your dead man’s fingers from your white meat because The Seafood Shack-ers Kirsty & Fenella are here to tell you exactly what to to!

Take One Cooked Crab

  1. Twist off all the legs, small and large. Sometimes the feathery grey gills called ‘dead man’s fingers’ will come out with the large claws – these are not good to eat and will make you feel sick so make sure to discard them. Most of the time they will be in the body.
  2. Put the crab on its back so its tummy is upwards. You will see the crab’s two eyes, and below these there are two small flaps. Move these aside and push down on the slightly softer shell underneath with both your thumbs.
  3. Push hard to crack through…
  4. Then you can pull out the middle section of the body.
  5. Inside it looks like a bit of a mess, but you can eat everything EXCEPT the dead man’s fingers.
  6. Don’t worry – they’re so distinctive you can’t miss them – they look just like feathers.
  7. Pick through the rest of the meat and put it in a bowl. This is where you will find most of the brown meat.
  8. Now have a wee tidy up and start on removing the white meat from the leg and claws. Get the larger legs first and tear the claw from the leg. There will be two small pieces of cartilage – just make sure they don’t go into your crab meat bowl. Use a pick or a claw tip to get the meat from the leg.
  9. Now for the claw. Get a large, heavy spoon or a knife (choose one you’re not that fond of). Place the claw flat on a board and crack it in the middle with the blunt side of your knife or the curved side of the spoon, then turn it over and do the other side. Remove the bottom part of the shell and you should be left with half a cracked claw. Give it a rinse to remove any loose shell. You can either leave it like this or get all the meat out with a pick – just watch for the large think piece of cartilage in the middle.
  10. Always make sure you thoroughly pick through your white crab meat as you’ll often find small pieces of shell in it. There’s nothing worse than chewing down onto a hard piece of shell! You now know how to dissect a crab and need never be scared again.

Now…

Get yourself a copy of The Seafood Shack – Food & Tales from Ullapool and make something delicious!

a chicken, jointed, before being fried
Author, chef and musician Sarah Savoy and her classic fried chicken recipe
Here is Sarah Savoy’s recipe for Fried Chicken from her book The Savoy Kitchen – A Family History of Cajun Food. It’s a real American – and Cajun – classic.

“There are many things I often just assume people know how to do because I grew up doing them, and I’m often surprised when people say, ‘Oh my goodness, how did you make this [insert any ordinary dish here, like fried chicken, meatloaf, etc.]?’

So let me just toss in this one random soul food comfort meal. Serve it up with mashed potatoes, a side of corn macque choux and maybe some biscuits and gravy. To stop it being a complete carb overload, smothered okra is also great with fried chicken.”

Ingredients

  • 1 whole chicken, jointed into 10 pieces
  • 500ml buttermilk
  • 1 tsp dry mustard
  • 1/2 tsp thyme
  • A dash of hot sauce (or more to taste)
  • 300g plain flour
  • salt
  • black pepper
  • cayenne
  • vegetable oil for frying

Prep

Put the chicken pieces in a bowl with the buttermilk and add the dry mustard, thyme and a dash of hot sauce. Season the chicken with salt, black pepper and cayenne and mis well, then leave it in the fridge for at least one and a half hours, turning the pieces every thirty minutes.

Pour off as much of the buttermilk as you can, then mix the flour in with the chicken pieces to coat them. The batter will be very sticky and moist.

Frying Your Chicken

Preheat the oven to 150ºC. Fill a deep, heavy-bottomed skillet with enough oil to cover the largest piece of chicken and heat the oil until it’s hot but not smoking. Working in batches, place the chicken pieces in the oil and fry on each side for at least eight minutes or until the juices run clear when you pierce near the bone with a small, sharp knife. Thighs take the longest – up to twenty minutes a side. Once cooked, remove the pieces, drain them on a bed of paper towels and transfer to the oven for only as long as it takes you to cook the other pieces.

Note:

While you’ve got the oil hot, why not mix up a batch of hush puppies to eat with the chicken? Mix up 240g cornmeal, 110g flour, 1/2 tsp bicarb, 1/2 tsp baking powder, 1/2 tsp salt, half a small onion (finely chopped), 250ml milk or buttermilk and an egg. Throw in some chopped jalapeños or crab meat if you have any and drop the batter by tablespoons into the hot oil. Fry on all sides until golden brown and drain on paper towels.

Note:

You can either fry the chicken wings as well, or freeze them to make hot wings another day.

Buy The Savoy Kitchen – A Family History of Cajun Food here

illustrated recipe for scottishstani spiced paratha by sumayya usmani

Recipe by

Sumayya Usmani

From

Tomorrow’s Kitchen – A Graphic Novel Cookbook

cartoon recipe for Scottishstani Spiced Winter Squash and Tattic Scone Paratha by Sumayya Usmani
Illustration by Shuangshuang Hao

Sumayya says about this lovely recipe for Scottishstani Paratha: ‘This recipe I share with you now has to be the one that gives me the most comfort. As a child, I would wake up on a Sunday morning to be greeted by the smokey scent of fresh parathas being made on the tawa (flat griddle pan), my mouth watering in anticipation of breakfast. My mother made these by mixing leftover mashed potato bhujia into flour to make thick breads with generous amounts of fresh coriander, green chilli, cumin and ghee. When I moved to Glasgow, I was amazed at how similar parathas were to tattie scones – leftover mash mixed with flour and butter, best cooked on a cast iron ‘girdle’. For me, this is my go-to breakfast now.’

Ingredients

  • 60g butternut squash, roasted until soft
  • 1 medium potato, peeled, chopped, boiled and mashed
  • 100g plain flour, plus extra for dusting
  • 1/2 tsp salt
  • 1/2 tsp ground turmeric
  • 1 tsp cumin seeds, toasted
  • 2 tsp coriander, finely chopped
  • 6 mint leaves, finely chopped
  • 1 green chilli, finely chopped or 1/2 tsp red chilli flakes
  • 2 spring onions, finely chopped
  • juice of 1/2 lime
  • 3-4 tbsp ghee or coconut oil

How to make your Scottishstani Paratha

Mix all the ingredients except the ghee in a large bowl. Stir in the melted ghee, a little at a time, until the mixture reaches a dough-like consistency.

Turn out onto a floured work surface and knead until smooth. Divide the dough into tennis ball-sized pieces. Cover with a damp cloth.

Heat a griddle pan, tawa or frying pan over a high heat. When hot, add a little ghee, then reduce the heat to medium.

On a floured surface, roll each dough ball into a 6mm-thick patty. Place in the hot ghee and cook gently, pressing down the corners with a clean tea towel or kitchen paper, to ensure it browns evenly. When one side is cooked – about 3-4 minutes – turn over and cook the other side. Repeat with the remaining dough and enjoy your Scottishstani Paratha!!!

cheesy scallops in the shell
Cheesy scallops topped with melted cheese
Photo by Clair Irwin

From The Seafood Shack – Food & Tales from Ullapool

by Kirsty Scobie & Fenella Renwick

Honestly, if you love scallops and you love cheese this is a must-do recipe! It is also a great crowd pleaser so perfect if you’ve got pals over
for dinner.

Serves 4

Ingredients

  • 16 scallops, shucked
  • glug of vegetable oil
  • a small handful of parsley, chopped
  • 4 lemon wedges
  • salt and black pepper
For the cheese sauce:
  • 50g butter
  • 1 tbsp plain flour
  • 1/2 vegetable stock cube
  • 300ml whole milk
  • 200g cheese, grated, plus extra for the top (we use a mix of Parmesan and Gruyère)

Also, 8 curved scallop shells, cleaned

How to make your Cheesy Scallops

Make your cheese sauce first. Melt your butter in a pan on a medium heat, then stir in your plain flour and the crumbled stock cube. Cook this off for a few minutes, stirring constantly so the flour doesn’t burn. Slowly pour in the milk, constantly whisking until you have a thick, smooth white sauce. There are no rules so add more or less milk depending on how thick you like your cheese sauce. Now stir in your cheese and keep on a low heat until it has melted.

Set your grill to a high heat. Dry the scallops well on kitchen roll to stop them spitting when you add them to the pan. Put the frying pan on a high heat and add the oil. When it’s good and hot, put in the scallops. You want to hear them sizzle – if they don’t, your oil isn’t hot enough. Don’t move them around in the pan, just let them fry for a minute and get a nice caramel colour. Season, then flip them over, season again and cook for a minute on the other side.

Now place two scallops in each shell and pour over some of the cheese sauce. Finish with some grated Parmesan, then put under the hot grill on a baking tray until the cheese starts to brown and caramelise. Serve with some chopped parsley and a wedge of lemon.

Buy The Seafood Shack – Food & Tales from Ullapool here

Street view of Brick Lane Market

Picture of a bowl of Chicken Korma and a plate of pilau rice with peas.

From Brick Lane Cookbook

by Dina Begum

Chicken korma cooked at home is unlike any restaurant version (which I would never eat). Originating from Mughlai cuisine, a real korma is rich, decadent and very special. It’s usually made with a mixture of whole spices, yoghurt and ghee, and cooked slowly to create a depth of flavour you really can’t get in a hurry. There are none of the colourings or sugar you get when you order the curry house version. Sometimes a little nut paste is added which makes the dish even more opulent and perfect for feasting. There are many variations of korma across the Indian subcontinent and I’ve based mine on the ones I’ve grown up eating. I use Greek yoghurt for a mellow, creamy flavour, less tangy than natural yoghurt. Whole green chillies are used for fragrance instead of heat so don’t be tempted to cut them as korma is meant to be mild. I find that a mixture of thigh and breast meat gives the best result, but you can use one or the other if you prefer.

  • 6 garlic cloves, roughly chopped
  • 5cm piece ginger, roughly chopped
  • 100ml oil
  • 2 tbsp oil
  • 1 tsp panch phoron
  • 3 medium onions, finely sliced
  • 1 1/2 tsp salt
  • 3 dried red chillies
  • 2 bay leaves
  • 8 cardamom pods
  • 4 cloves
  • 6 black peppercorns
  • 2 cinnamon sticks
  • 1 star anise
  • 1 1/3 tbsp ground cumin
  • 1 1/3 tbsp ground coriander
  • 1/2 tsp chilli powder
  • 1/8 tsp ground turmeric
  • 800g skinless chicken breast and thigh meat, chopped into bite-size pieces
  • 300g Greek yoghurt
  • 6 whole green chillies

To make your chicken korma

Crush the garlic and ginger together in a mortar and pestle. Heat the oil and ghee in a large pan on medium-high heat and add the garlic, ginger and panch phoron. After a minute add the onions, salt, dried red chillies, bay leaves, cardamom, cloves, black pep- percorns, cinnamon sticks and star anise and sauté until golden – around ten minutes. Add 200ml water, cover and simmer on low heat for 20 to 25 minutes, until the onions have broken up and the oil has separated.

Keep checking regularly and if the mixture gets too dry or catches at the bottom of the pan add a dash of water and continue cooking.

At this point stir in the cumin, coriander, chilli powder and turmeric and turn up the heat to medium. Cook for two to three minutes until the spices are fragrant and have separated from the oil. If the mixture gets too dry, add a dash of water so the spices don’t burn then cover and cook for a few minutes. Now take the chicken pieces and add them to the pan. Stir this around for a couple of minutes to seal the meat, then cover and cook for ten minutes, checking now and then to make sure nothing’s burning. Towards the end of the ten minutes you’ll notice the chicken releasing moisture – which indicates that it’s almost fully cooked.

Take the pan off the heat, wait for a minute and then gradually add the yoghurt, a little at a time so it doesn’t curdle. Finally, toss in the green chillies, return the pan to a very low heat and simmer for another eight to ten minutes, stirring occasionally, until the chicken is tender and the gravy is thick and silky. Serve with my easy pilau rice with peas.

Cook’s tip – to ensure the very best chicken korma it is absolutely essential that you take your time over the onions. They should slowly soften, until they almost caramelise and disintegrate. Add a dash of water now and then if they brown too quickly and be patient!